Playing barre chords is one of the toughest parts of learning guitar. For beginners and even more experienced players they are a source of frustration and pain.
I’m going to sound like a bit of a pompous ass now, so forgive me, but barre chords were something I didn’t really struggle with. There was still discomfort when I was first learning them and it’s not like I had them down on my first try.

But compared to a lot of people I definitely found them easier. And what’s that shown me though is not only how lucky I was but also how important they are. I really took them for granted.
So I’m hoping here I can pass on some tips and ways to really nail barre chords. We will look at how to position your fingers properly, getting the right amount of pressure, how to avoid muting strings, ways to build finger strength and endurance as well as exercises to help you master barre chords.
Good Technique is the Key
If you’ve been searching for help on playing barre chords you’ve probably encountered lots of advice like: “just keep practicing”, “you’ll get there eventually” and “it takes time”. Which is all nice but doesn’t really help if you’ve been struggling for a while with no improvement.
The most important part of really mastering barre chords is getting the right technique. You need good, consistent practice as well but that’s ultimately going to be useless if your technique is wrong.
And too often the technique is where the problems lie. Most commonly that is pressing harder and harder when you can’t get your barre chords to sound right.
All that leads to is muscle fatigue and finger pain, if not worse and an actual injury. If you’re playing for any length of time and really exerting a lot of force then there’s a good chance of hurting your tendons or straining muscles.
If you’ve been having a really hard time with barre chords then this will sound crazy, but: you don’t need that much pressure to get barre chords to sound good.
With the correct finger, hand and arm position and technique you won’t need to press down on the strings nearly as hard as you think you do.
There is one other factor though that will play a big part of how difficult or easy barre chords are..
Make Sure Your Guitar is Setup Properly
I can’t empathize it enough – your guitar needs to be setup properly. If your action is too high or you neck is bowed then even with the best technique you’re going to find barre chords so difficult.
If you’re not sure what action is then see this guide to guitar action. But fundamentally it’s the distance between the strings and the fretboard.
So if you’re action is too high, i.e. the strings are a long way from the fretboard, understandably that’s going to make playing barre chords much harder.
In fact it makes playing everything much harder! The strings being further from the fretboard means it requires more effort to press them down.
Too low action is an issue as well, albeit for different reasons. If the strings are too low and near to the fretboard then you’re likely to get fret buzz as the strings don’t have enough room to vibrate properly.
So it’s a good idea to adjust your action and get it right regardless.
Barre Chord Tips – Technique
So, assuming you’ve got your action right let’s get into the correct technique. These first tips will focus on that technique and making sure you get it down perfectly. Then we’ll move on to tips for playing barre chords.
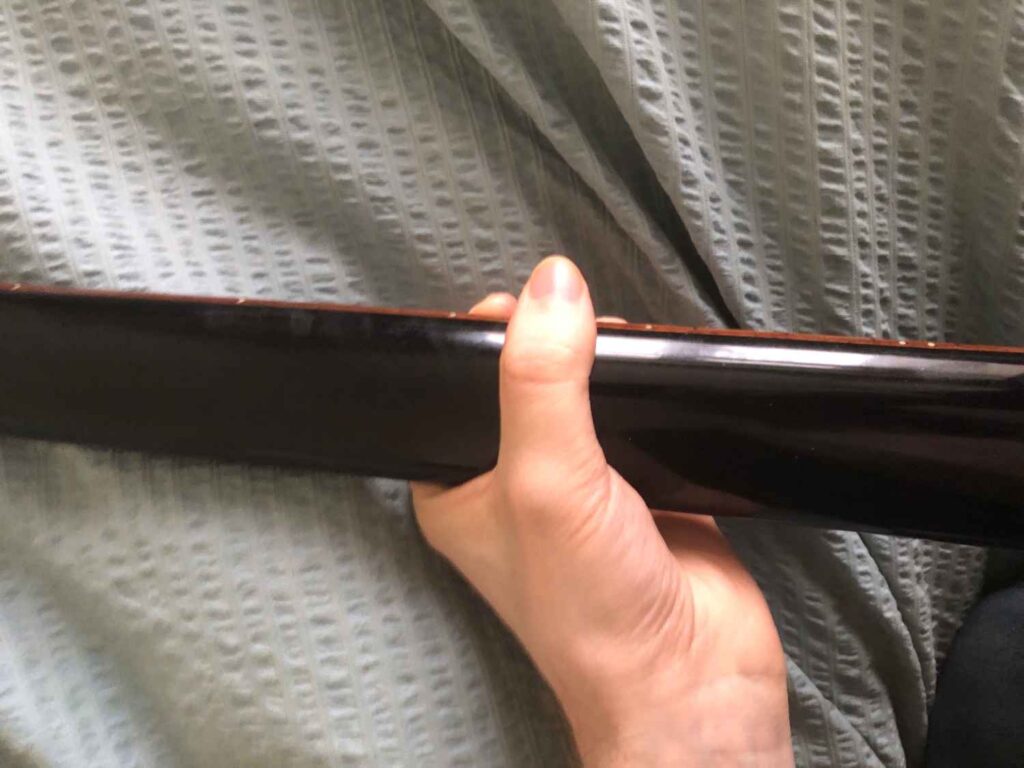
Thumb Position
Getting your thumb in the correct position is arguably the most important aspect of conquering barre chords. If it’s wrong it’s going to seriously hold you back.
You want the thumb to be horizontal, facing up and roughly inline with your first finger or between the first and second finger. Keep your thumb in the middle of the neck or a little lower as it ensures the pressure is even.
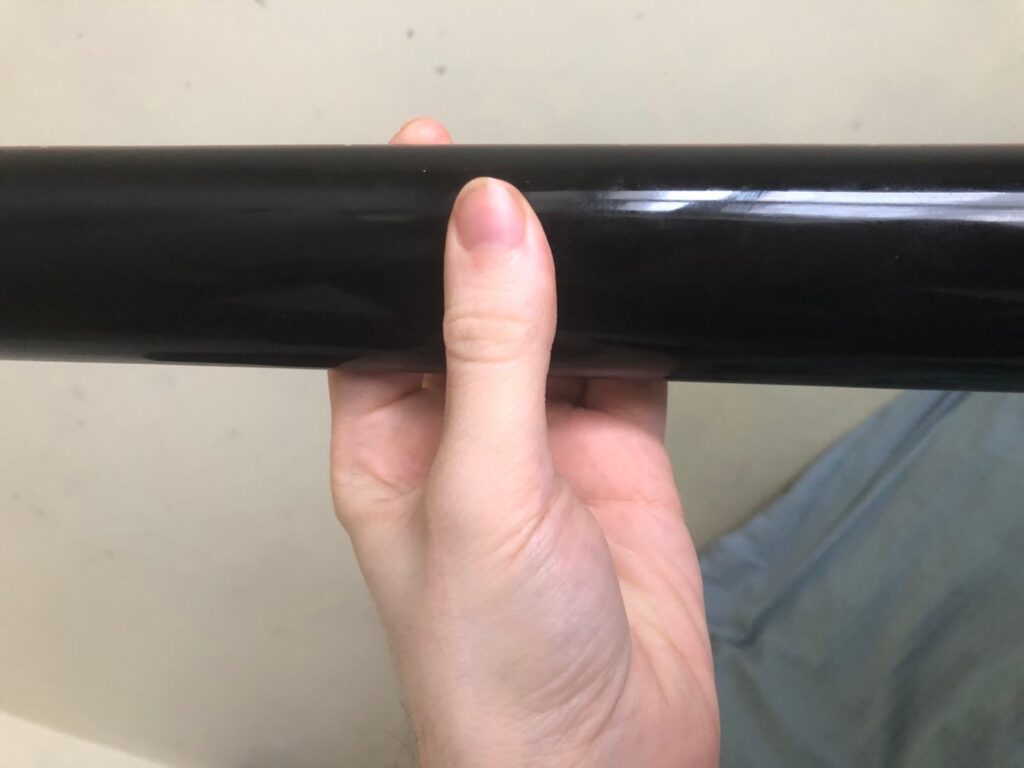
Even though I said earlier I didn’t struggle much with barre chords one area I did get wrong initially was my thumb placement. I’ve got hitchhikers thumb and so when I first starting learning chords and barre chords my thumb would often look like this:
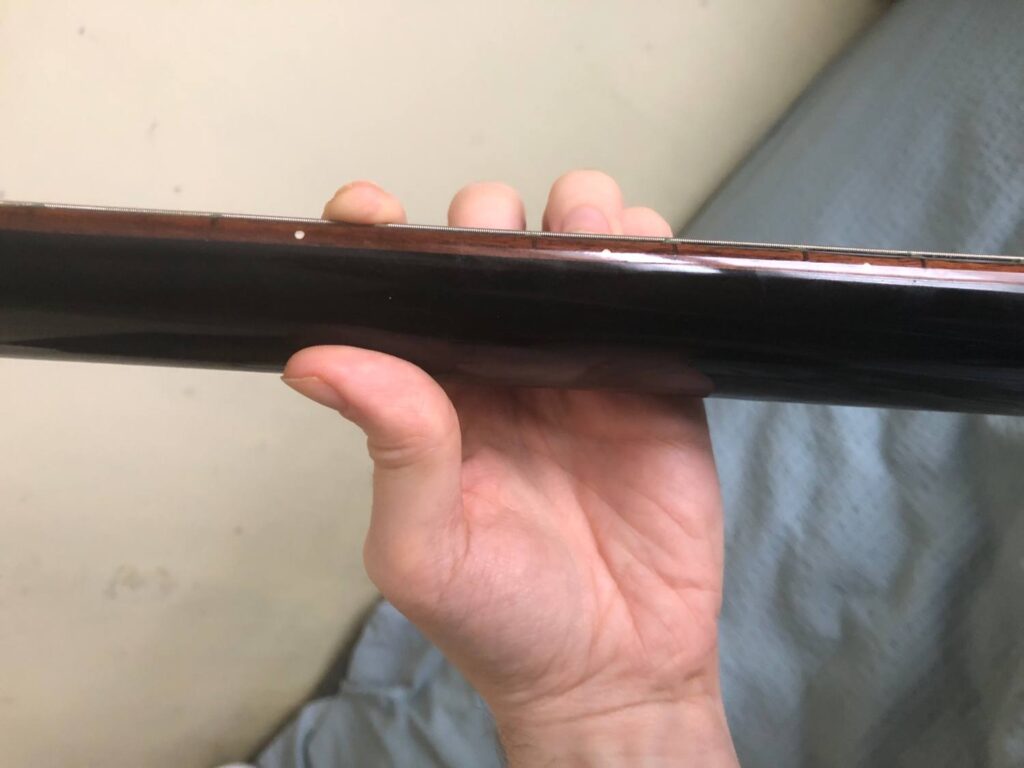
Which is definitely wrong. If your thumb is similar to that when you’re playing barre chords you’re going to face some problems. Also you don’t want to wrap the thumb around or over the neck and be gripping it too forcefully.
These are all wrong thumb placements:
Yes, lots of people play with the thumb over the top and use it to fret the low E string. Hendrix did it, I know.
But when you’re starting out or struggling generally with barre chords it’s best to learn the proper way first. Then move on to the thumb over the top.
Anyway, why the thumb position is important is that it acts as an anchor. When you push down the strings you’re exerting pressure on the fretboard and with barre chords it’s a lot of pressure as you’re using all or most of your fingers.
The thumb is there to counteract that pressure. But if it’s in the wrong place it will absorb too much of the force in one position rather than it being evenly distributed. It’ll then hurt and get worn out much quicker.
Elbow Position
You need your elbow in the best position too. That position is to bring the elbow of your fretting hand closer to your body.
Having your elbow there will give you more leverage and also allow you to easily roll your index finger when barreing (the next tip). If your elbow is sticking out and not tight in against your body you will struggle with having enough strength to roll and push that index finger towards the head of your guitar.
You’re also more likely to develop tension in your arm if it’s stuck out at an angle rather than naturally hanging beside your body. Whilst playing the guitar feels really awkward at first it’s get more comfortable and you should be aiming for everything to feel as relaxed and tension free as possible.
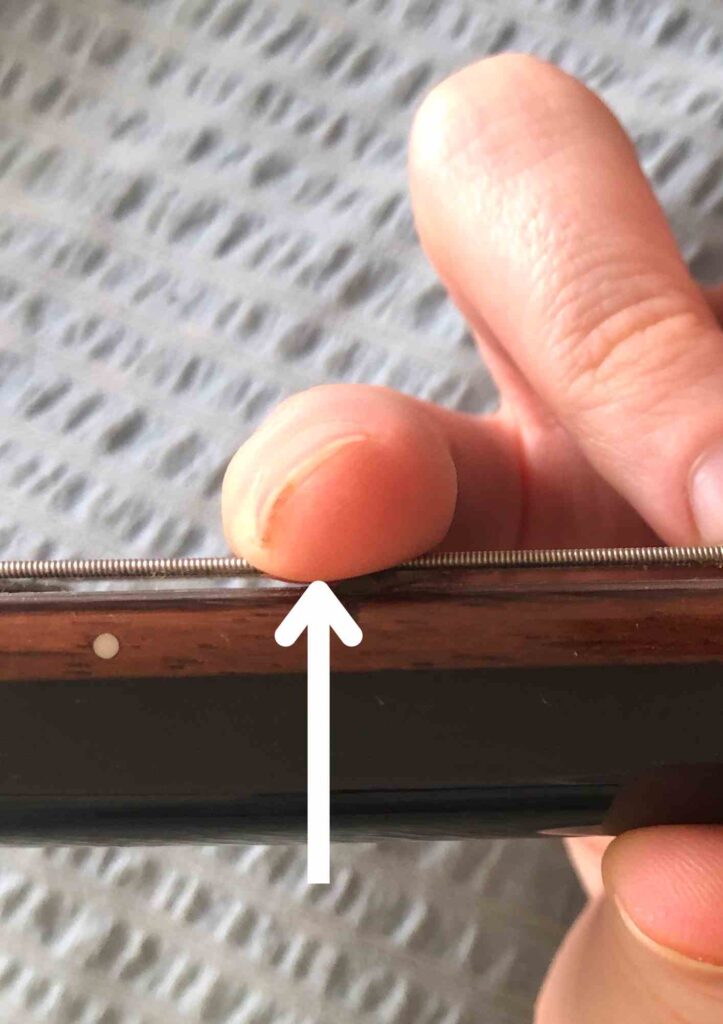
Use the Edge of your Finger
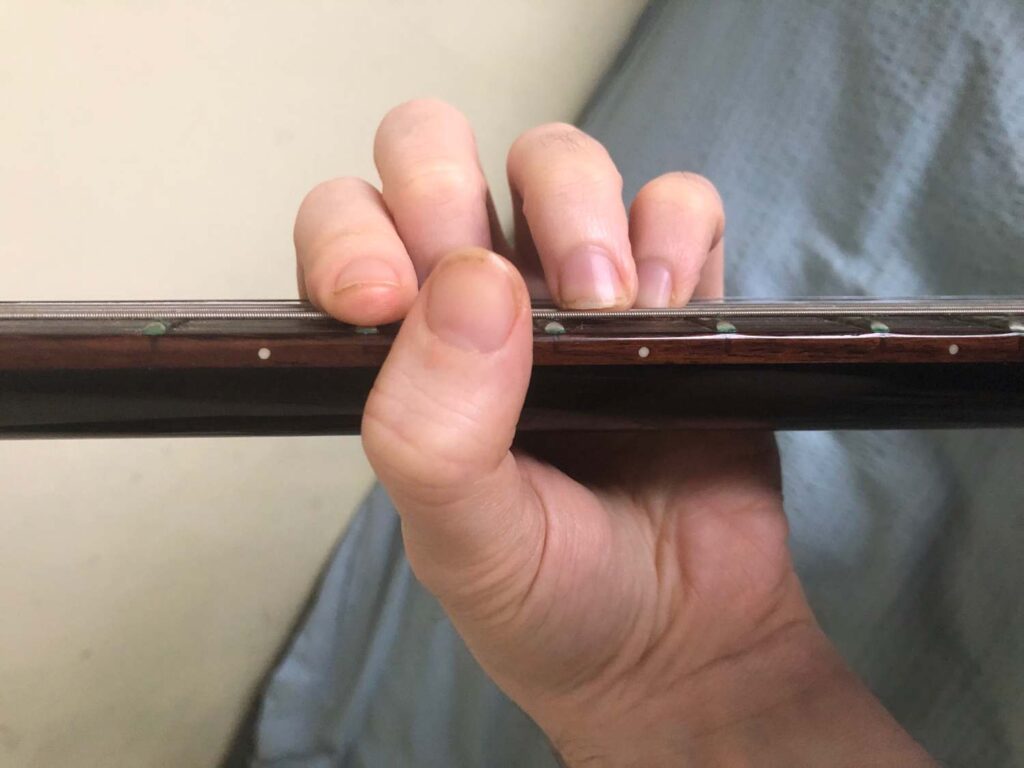
As mentioned in the previous tip you want to use the edge of your index finger when barreing. Not the soft, fleshy, padded part.
On the outside of your index finger can you feel where it’s bony and hard? That’s the part you want to be using.

Why that part of the finger? As it’s harder and bony it’s able to put more force on the strings. If you use the fleshy part thats softer it’s going to hurt more and a lot faster.
So put that finger down on the strings to barre and then roll it away from you towards the headstock. Like this:
Keep Index Finger Close to Fret
This applies to all playing in truth but it’s especially important if you’re finding barre chords hard. You should be aiming to get your fingers as close to the frets as possible.
So for example when barreing with your index finger start with the finger flat and right up against the fret, maybe even on that fret itself. Then you roll the finger slightly (as in tip #3 above) on to its edge. As you roll it your finger comes off the fret but remains very close to it.
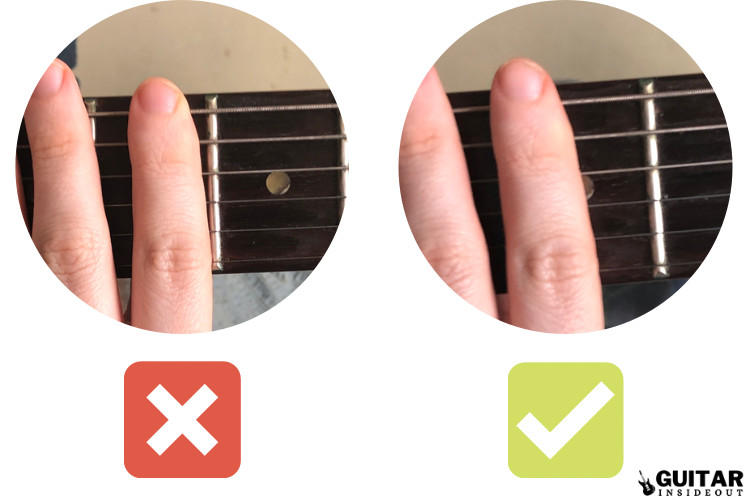
Why this is a big deal and makes a difference is because as you get closer to to the fret it’s a lot easier to hold it down. You will be using far less pressure and force at the point closest to the fret than further away or in the middle of it.
Never barre in the middle of the fret. It will make it much more difficult and either tire your hands quickly because of the force required or result in your chord not sounding properly.
Pull the Fretboard Towards You
You can and should utilize the fact your arm has more strength than your hand by pulling the fretboard towards you when barreing. This may sound odd but you shouldn’t be letting your hand do all or most of the work.
Instead try this:
- Place your fingers on the fretboard as if you were going to play a barre chord. But don’t push down.
- Take your thumb off the back off the fretboard but keep your fingers in place. Your hand and thumb should remain relaxed.
- Using the arm of your fretting hand pull towards your body. Your hand will push down on the strings automatically as your arm pulls in to your body.
- Now see if you can play a barre chord cleanly this way. You should be able to use enough strength from your arm so that the fingers can hold down the strings and the thumb is irrelevant.
This might be tricky if you’re used to using your thumb as an anchor. But actually the thumb should be passive and only there to stabilize the position of your fingers.
If you’re using it to squeeze hard then you will run in to problems with tension in the hand and your ability to play barre chords for any length of time. So it’s important to work on your arm strength and using it to provide a lot of the force when barreing and not relying on your thumb.
Essentially it’s about pressing the guitar neck to your finger rather than pressing your finger down on the fretboard. While there is some strength needed for barre chords relying solely on muscle strength and force to overcome and compensate for poor technique is a recipe for disaster.
Find the Best Spot for your Index Finger
Everyone is slightly different. We all have different hand sizes and finger lengths.
I have tiny hands for a man and very short fingers. But I can still do barre chords. So you can’t use that as an excuse!
But as we all have various hand and finger sizes it means you need to find the spot on the strings that suits your index finger. Where you place it and find best for playing barre chords will be different to me and everyone else.
So try moving your index finger up and down when barreing the strings. Experiment with it and see whereabouts you find placing it works for you.
You might also find that where your finger bends or where you have a crease in it lines up with the strings and ends up muting it. I had to adjust my finger position as I was always muting the G string. None of the other strings, just the G.
So it’s important to really analyze where your finger is and how changing its position can help. One thing to keep in mind though is that you shouldn’t have your finger sticking up too far above the fretboard.
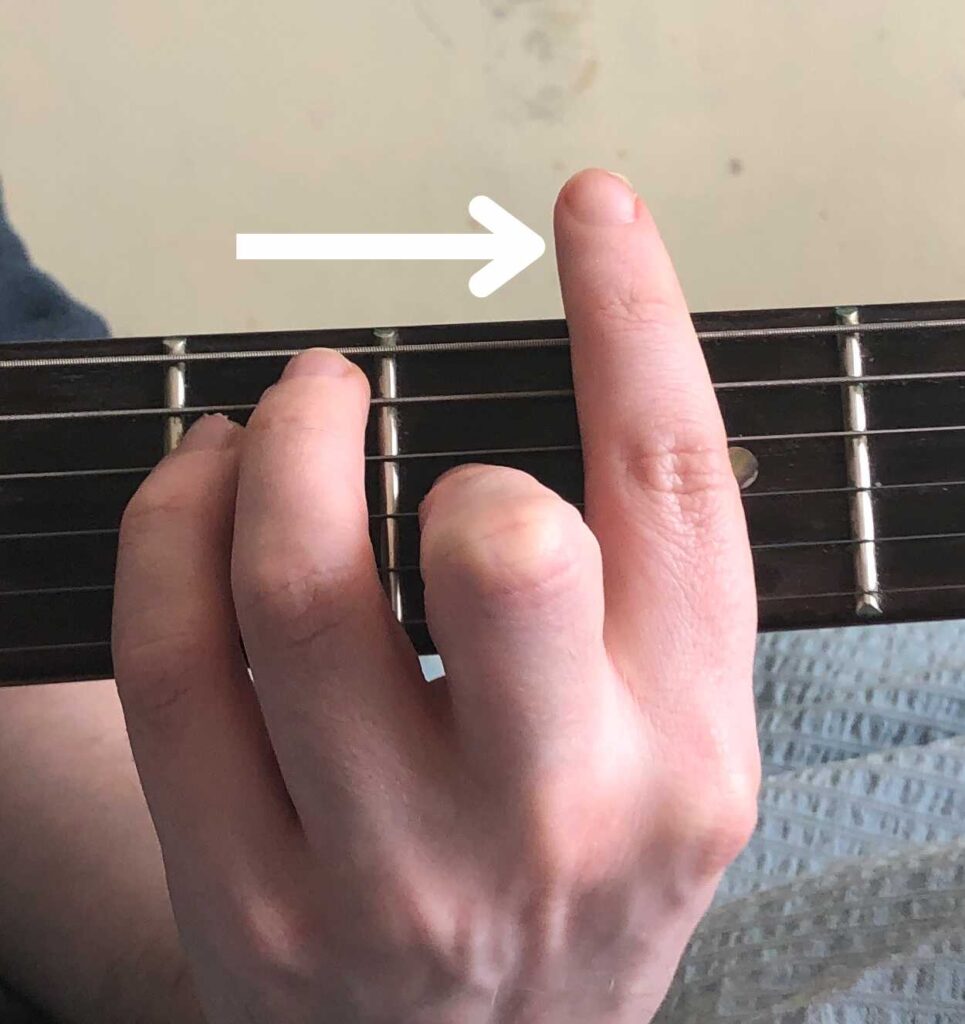
Keep your Index Finger Straight
Along with moving your index finger around, as the tip above talks about, you need to keep an eye on how straight that finger is. If you bend it in the middle or it arches when barreing then you’re going to mute some strings.
What usually happens is your finger is pressing down the highest and lowest strings but missing out one or more in the middle. Along with my thumb position this was this biggest struggle I had.
You really have to focus on the middle part of your finger and try to press down mostly there. You may find this feels odd and your natural instinct is to press all the strings, not just the middle one’s. But it should act to straighten your finger and get enough pressure on those middle strings that are causing you problems.
Focus on Certain Strings
For most barre chords your index finger dos the barreing and other fingers will be playing other strings. For example the E shaped barre chord has your other 3 fingers holding down the A, D and G strings.
As those strings are being held down by the other fingers you can basically ignore them. They’re sorted.
It’s then all about the barreing index finger. Which only needs to focus on the remaining strings – 1, 2 and 6. So all the pressure should be directed to those strings.
Tips for Playing Barre Chords
Hopefully the tips so far have helped with your technique. Now let’s get into playing barre chords.
Practice on Higher Frets
The closer you play to the nut the harder it is. Try playing any barre chord at the 1st or 2nd fret then try at the 7th and 8th. Much easier, right?
This is partly because it’s a bigger stretch. The frets are further apart the nearer to the nut you are.
It also requires the greatest amount of pressure to hold the strings down at the nut as the strings have more tension there compared to higher up the fretboard.
The solution? Practice all your barre chords further up the fretboard. With less force needed and a smaller stretch it means you can focus on finger placement and getting the chord to sound clearly.
You don’t have to deal with as much pain or discomfort and your technique will improve. Then once you’ve nailed them on the higher frets you can start slowly moving back down the fretboard. And as your technique will be good by this point you won’t struggle nearly as much.
Don’t go too high up the fretboard though. If you try playing barre chords at something like the 15th fret you’ll find that just as awkward as the lower frets. There’s a nice happy medium position somewhere in the middle of the fretboard (roughly between the 5th and 12th frets).
Lay your 3rd, 4th and 5th Fingers First
Rather than laying your index finger down first try putting down your other fingers of the chord before it. Get them right, strum them to make sure they’re sounding good, then lay down your index finger.
This should help to get your index finger aligned properly with the rest and build up better muscle memory of where they all go.
Don’t Strum, Pluck!
When I was first learning I would be practising my barre chords and happily strumming away confident I was doing great. They sounded fine, the strings were ringing out – all good.
It was only later when I started individually plucking the strings from the chord instead of strumming it I realized I was actually muting one or more strings. There were dead notes. It wasn’t good at all!
This is the problem with strumming the chord – most of us can’t hear the muted notes. Well, unless you’re muting pretty much all of them!
But if it’s just one or two dead notes on the middle strings it’s really easy to miss. So in order to make sure you’re playing your barre chord correctly pluck each individual string.
You’ll quickly see which strings are dead or not sounding fully and you can then work on correcting them. There’s a good chance you’ll notice a pattern in the strings that you’re struggling with too. It tends to be the same strings and that will also help you to identify what exactly you need to work on.
Practice!
You knew this was coming, right? There’s no getting round it I’m afraid. All the tips here will help but it still comes down to lots and lots of hard work and practising.
You can’t except to master barre chords in a short amount of time. It takes most people months to get there and that involves building strength, perfecting technique and lots of repetition.
Barre Chord Shapes
There are many different barre chord shapes. But realistically there’s only a few you really need to know.
It doesn’t hurt to learn the G shape barre chord, for example, but very few people actually play it. We mainly play partial versions of it because it’s a really awkward stretch.
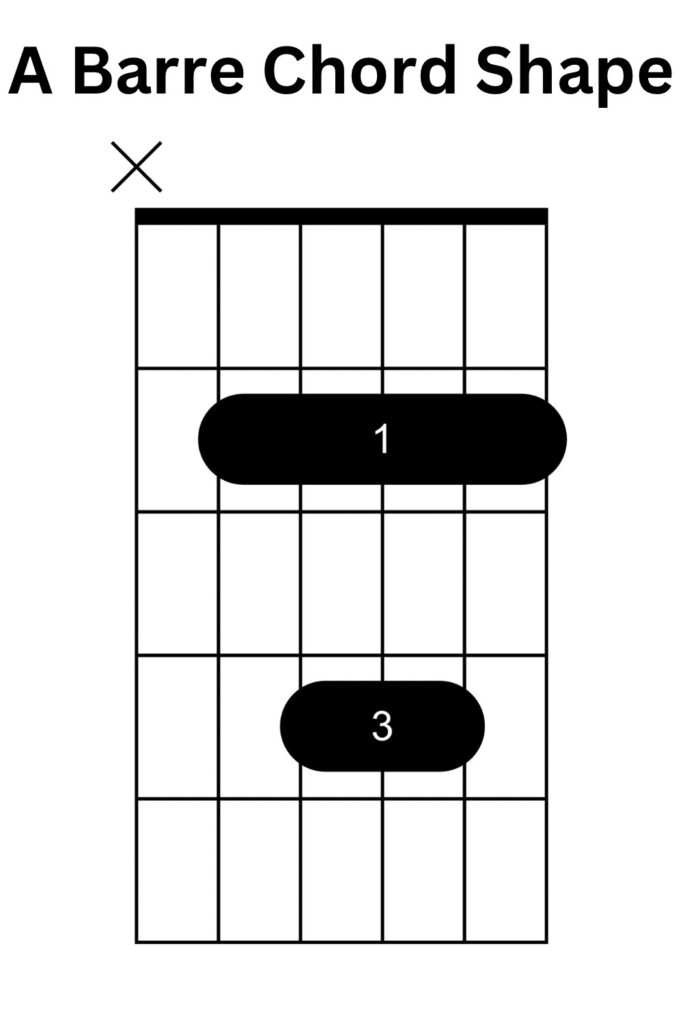
The shapes you should learn though and that crop up in so many songs are the A and E shape.
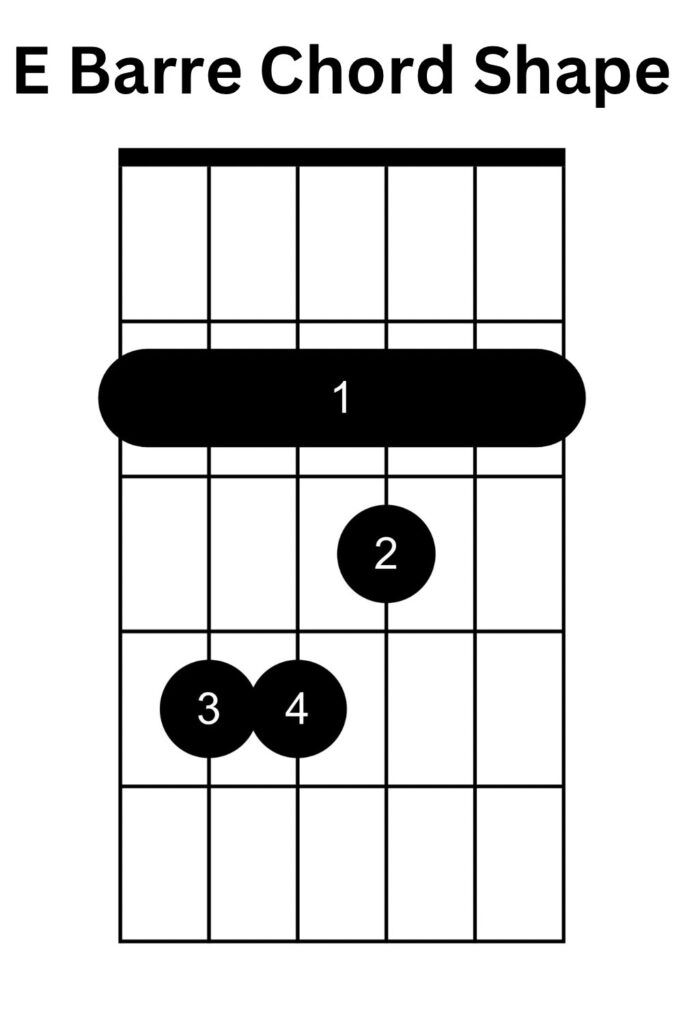
A Shape
E Shape
If you can master just those two shapes it will open up your playing. The good thing about those barre shapes is that once you’ve got the shape down you can move it around to any fret and play a major chord.
The root note of them gives you the name of chord. So if you know the notes on the fretboard (learn them if you haven’t!) you can quickly play any chord you want.
Quick example: if you wanted to play a G major barre chord, you know the low E string at the 3rd fret is a G, so you play the E shape barre at the 3rd fret and that’s your G! Move it up a fret it’s G#, up another it’s A, and so on.
The same applies with the A shape too.
Barre Chord Exercises
So now you know how to play barre chords the right way let’s try some exercises to help you get more comfortable with them. Knowing how to do it the right way is only half the battle – you’ve still gotta practice!
Exercise #1
The first exercise is going to be tricky but really helps to build strength and gets you to focus on your finger placement. As you’re only going to use your index finger you’ll be able to work on adjusting and moving it up and down to find the perfect spot for barreing.
So, here we go:
- Begin by barreing just two strings (the high E and B string) with your index finger at around the 7th fret. It doesn’t have to be the 7th, just start somewhere further up the fretboard and not on the first few frets.
- Now strum 5 times and make sure each string is held down properly and the notes are sounding clear.
- If you hear dead notes then check to see why your finger isn’t holding the string down. Try moving your finger up and down, adjust your thumb position etc. Look through the tips above and keep trying until you get it.
- Next shift your index finger up slightly so you’re now barreing 3 strings: the high E, B and G. Repeat the same as before – strum 5 times and be sure each note sounds clean and clear. Again if you hear dead notes check to see why.
- You carry on moving your index finger up and adding a string to you’re barre until your it’s barreing all 6 strings. When you reach 5 or 6 strings it will definitely be a struggle! Don’t get discouraged. Keep practising and building strength and calluses, it will come.
Once you’re comfortable with barreing all the strings at the 7th fret (or wherever you started), try starting again from the beginning but moving down a fret to the 6th. As you go down and get closer to the nut you will notice it becomes more difficult. This is a great way to slowly build strength and endurance.
Exercise #2
Another important part of barre chords is muscle memory. Your fingers need to get familiar with the various barre chord shapes.
A good way to do this is simply by placing your fingers down on the strings in the correct barre shape and then removing them. You don’t need to strum the chord, just make the shape.
Repeat this over a few times with whichever shape you’re working on. You’ll be getting your fingers used to making that shape and increasing your muscle memory for it.
Exercise #3
Moving barre chords is hugely important. They’re not much use if your stuck in one position.
So you need to get used to moving them up and down the fretboard.
Start with either an E or A shape on whichever fret you like. Then move that shape up one fret. Do it slowly and get used to how you have to move your fingers and fit them into the frets.
Then go back the other way and down the fretboard. Take it slow and focus on making sure you get your fingers down each time you move and your chord is sounding clear afterwards.
You can then switch shape and try others as you get more comfortable with moving barres around.
Don’t spent too long on it. 5 minutes should be enough, its just to build up the feeling of moving them around and over time it will feel more natural and eventually like second nature.
FAQ
Why do People Struggle with Barre Chords?
A combination of getting technique wrong and lack of practice. Many of those learning the guitar, especially self teaching, get the technique wrong and press too hard rather.
If you have the correct technique then barre chords become a lot simpler. And then it’s just a case of practising enough.
But barre chords are hard! They’re painful and require you to go through some discomfort and take time to get.
How Long Does it Take to be able to do Barre Chords?
It depends on how often and what you practice. If you dedicate some time every day to practicing barre chords, building hand strength and muscle memory it should take only take a couple of months.
The more often you practise and for longer then the quicker you’ll get them. But if you use the wrong technique you will be struggling for a lot longer.
What is the Easiest Barre Chord to Play?
You can play partial versions of barre chords if you’re finding them really difficult. The partial version of the F chord only barres 2 strings and so is much easier than the full version.
If you’re playing the full versions then I personally think the E shape is the easiest.
Why are Barre Chords Easier on Electric Guitar?
Electric guitars have thinner strings and lower action (distance between fretboard and string). Holding down lighter gauge, i.e. thinner, strings that are nearer to the fretboard is a lot easier.
Mastering Barre Chords
Hopefully this guide will have given you some good tips and guidance on improving your barre chords. They’re such a fundamental part of learning guitar but at the same time one of the most difficult aspects for beginners.
It’s worth the time and effort though as your playing will improve considerably when you get the hang of them. So stick with it!
Thank you for this, it’s perfect for what I’m attempting! However, I am learning to play a song with the most difficult scenario: Freight Train — Elizabeth Cotten. I’ve got the finger picking, I’ve got the melody, I’ve got the chords… except for the F barre chord. It involves a finger-picking pattern incorporating moving from F major to F7, while of course holding down the entire barre at the first fret. I can play this part slowly and painfully, so I’m going to focus on the techniques above while building strength to play up to tempo.
Hi Laura,
I’m glad you’re finding the tips here helpful! The F barre is the trickiest, as it sounds like you’re already very aware of! But I’m sure if you stick with it you’ll get there. ‘Freight Train’ is a lovely piece and definitely worth the effort.
All the best!